In today's video, we dive into the best paddle length for your stand-up paddleboarding (SUP) needs.
Key Topics Covered:
All-Around Paddle Length:
Ideal for entry-level paddlers using bigger boards in flat water.
Suggested length: Around 10 inches above your head.
Advanced Paddle Length:
Slightly shorter paddles for better control and reduced shoulder strain.
Methods: Wrist watch level and Shaka sign method (6-8 inches above head).
Application-Specific Lengths:
Racing: Shorter paddle for low-volume boards and dugouts.
Surfing: Very short paddles (head high or lower) for quick maneuverability.
Personal Preferences:
Factors like board size, paddling style, and blade size affect optimal paddle length.
Avoiding Injuries:
Proper paddle length to prevent shoulder and lower back strain.
Blade Size Considerations:
Smaller blades for efficiency and better catch versus larger blades for more power.
In this informative video, Robert Stehlik from Blue Planet Surf offers a detailed guide on selecting the best paddle length for stand-up paddleboarding (SUP). Understanding the right paddle length is essential for comfort, efficiency, and preventing injuries. The video covers three methods to determine the correct paddle length, variations for different SUP activities, and the differences between adjustable and fixed-length paddles.
Choosing the Right Paddle Length
All-Around Use
For entry-level paddlers using bigger boards in flat water, a longer paddle is often recommended. Robert suggests a length where the paddle reaches about 10 inches above the head when standing upright. This length is suitable for casual, upright paddling on larger boards.
Advanced Paddling
As paddlers gain experience, they might prefer a shorter paddle. Shorter paddles reduce shoulder strain by keeping the arm lower, allowing for more powerful and controlled strokes.
Wrist Watch Method: The paddle should reach the wrist watch level when standing.
Shaka Sign Method: Using the Hawaiian Shaka sign over the head, adjust the paddle to be about 6-8 inches above the head.
Application-Specific Lengths
Racing and Low-Volume Boards
For racing and using low-volume boards or dugouts, a shorter paddle is recommended. Since these boards keep the paddler closer to the water, a shorter paddle provides better leverage and efficiency.
Surfing
For stand-up paddle surfing, even shorter paddles are preferred. Advanced SUP surfers often use paddles that are head-high or even lower, such as forehead or eye level. This shorter length allows for quick transitions from side to side and provides more maneuverability and power during takeoffs. However, beginners might find shorter paddles challenging as they require more leaning and can strain the lower back.
An alternative method: placing the paddle upside down and adjusting the length so the neck of the blade is at face height. This ensures the blade is fully submerged during paddling, keeping the handle ergonomically positioned. It's crucial to avoid having the elbow above the shoulder, as this can cause injuries.
Blade Size and Preferences
Choosing the right paddle length is personal, and paddlers should experiment to find what works best for them. Preferences may vary depending on paddling style, board size, and blade size. Smaller blades offer quicker acceleration and efficiency, while larger blades provide more power but can be cumbersome if not fully utilized.
Injury Prevention
Ensuring the correct paddle length helps prevent shoulder and lower back injuries. Using a paddle that's too long can place undue pressure on the shoulders, while a paddle that's too short may cause the paddler to lean excessively, straining the lower back.
Search Keywords
Best paddle length for SUP,
Stand-up paddleboard paddle length,
How to choose SUP paddle length,
Adjustable vs. fixed-length paddle,
Paddle length for beginners,
Advanced paddleboarding tips,
SUP paddle length guide,
Paddleboarding shoulder injury prevention,
Optimal paddle length for surfing,
Efficient paddling techniques,
Blue Planet Surf paddleboarding tips,
Stand-up paddleboarding for beginners,
SUP paddle adjustment methods,
SUP paddle blade size,
Preventing paddleboarding injuries,
Paddleboard gear setup,
SUP paddle ergonomics,
Paddleboard racing tips,
SUP surfing techniques,
Choosing SUP equipment
We hope you liked the video, please give it a thumbs up and subscribe to the blueplanetsurf YouTube channel, we post a new video every Saturday morning, Aloha!
Please come visit one of our shops on Oahu:
Hale'iwa shop and rental location:
Blue Planet Hale'iwa
62-620F Kamehameha Highway
Haleiwa, Hawaii 96712
Tel (808) 888 0786
Open daily, 9 am to 5 pm
http://www.blueplanetadventure.com
Honolulu store- - Hawaii's SUP and Foil HQ:
Blue Planet Surf
1221 Kona St
Honolulu, Hi 96814
Tel (808) 596 7755
open 10 am to 5 pm Hawaii Time, closed Wednesdays and Sundays
http://www.blueplanetsurf.com

Surfing and Stand Up Paddling as Zen arts. Written by Len Barrow and Robert Stehlik. Focus and paying attention to technique, equipment, mental aspects, the interplay with nature and others.
Saturday, June 15, 2024
Saturday, October 1, 2022
How to Kayak for the first time in a two person kayak
How to kayak for the first time in a tandem kayak: this video covers the basics, including: going out in ideal condition: easy launch, calm water, staying close to shore, preparing for getting wet, don't take anything that will sink if you capsize. Using a sit on top kayak, getting in and out, paddling in unison or tandem, steering, paddling backwards, safety and more.
Visit the Blue Planet Adventure Company in Haleiwa if you want to learn to paddle a kayak for the first time! You will find us at the end of the Rainbow Bridge, Aloha!
Please also watch: How to Kayak in 5 minutes:
https://youtu.be/68KMZXAstSs
We hope you liked the video, please give it a thumbs up and subscribe to the blueplanetsurf YouTube channel, we post a new video every Saturday morning, Aloha!
Please come visit one of our shops on Oahu:
Hale'iwa shop and rental location:
Blue Planet Hale'iwa
62-620F Kamehameha Highway
Haleiwa, Hawaii 96712
Tel (808) 888 0786
Open daily, 9 am to 5 pm
http://www.blueplanetadventure.com
Honolulu store- - Hawaii's SUP and Foil HQ:
Blue Planet Surf
1221 Kona St
Honolulu, Hi 96814
Tel (808) 596 7755
open 10 am to 5 pm Hawaii Time, closed Wednesdays and Sundays
http://www.blueplanetsurf.com
Saturday, August 6, 2022
Downwind Foil Race Recap- BlueWater Classic- Wing Foil Race and SUP Foil Race
The Molokai 2 Oahu Race was cancelled again this year and a shorter course on Oahu took it's place- The BlueWater Hawaiian Classic. The organizers set up a special, shorter course for SUP foilers to be able to race in the bumps- from Portlock Point to the Windsock at Kaimana. They also opened the race to Wing Foilers and we ended up having the biggest field yet of foiler racers on Oahu gather at the start off of Portlock Point.
The video voiceover touches on the history of the race, training, participants, equipment used, technique and strategy, results and more.
Photo credit: Pat Meyers
videos by: Jeff Chang, Derek Hamasaki, Kevin Lee, Robert Stehlik and others
editing: Lucas Purcell and Robert Stehlik
These are the official Foil Race results for the foil divisions:
https://www.instagram.com/p/Cga7DCJLfAo/
molokai2oahu
The Foil Division featured both Wing and SUP from China Walls to Kaimana Beach! The classic Hawaii Kai run a was perfect match for Nani Dalene who dominated with 2nd overall 🔥
🌺Men Wing FOIL
Robert Stehlik 26:30
Eli Maioho 28:06
Josh Lawrence 28:23
🌺Women Wing FOIL
Nani Dalene 27:55
Glennel Jordan 47:70
🌺Men FOIL
Jack Ho 28:19
Andrew Gibbons 30:24
Eric Sterman 30:50
🌺Women FOIL
Andrea Moller 46:00
Here is a link to the complete GPS data from my Garmin watch:
https://connect.garmin.com/modern/activity/9267864602
We hope you liked the video, please give it a thumbs up and subscribe to the blueplanetsurf YouTube channel, we post a new video every Saturday morning, Aloha!
Saturday, April 9, 2022
History of SUP
Watch this video for a brief summary of Stand Up Paddleboarding:
History of Stand Up Paddleboarding
There are many examples of paddling in a standing position and it seems to come naturally.
I’m going to go over some of the earliest recorded records of humans standing up while paddling, a short history of SUP surfing in Hawaii, and how modern stand up paddleboarding and surfing has become so popular worldwide.
Fishermen in Peru and Ecuador used reed rafts for fishing and for going in and out through the surf around 3000 years ago.
Hasake were used in Israel with records dating back to the roman empire and are basically big SUP’s with a two sided paddle. Still used by lifeguards today.
There are also many native tribes that paddled standing up in dugout canoes
SUP Surfing
Was known as Beach Boy surfing- culture emerged in Waikiki when first hotels opened.
Most famous beach boy was Duke Kahanmoku- he introduced surfing to California in 1912 and to Australia in 1914, known as fastest swimmer alive with 2 gold medals in Antwerp, Belgium in 1920 and many world records in swimming.
Duke was known to surf standing up on a long board, using a long paddle.
In the 1940, John Zapotoki started used a big longboard and custom made wood paddles to surf in Waikiki until he was 91 and saw his sport boom
Pops Ah Choy was a Waikiki beach boy well known to standing up surfing with a hard had
Ron “Canoe” Drummond surfed a canoe standing up with a paddle in Dana Point, California.
More recently, Laird Hamilton and Dave Kalama picked up paddles and stood up on big longboards during an Oxbow photoshoot which started the moden area of Stand Up Paddleboarding and its global popularity today.
Brian Keaulana added “Beach Boy Surfing” division to the Buffalo Big Board contest at Makaha and the sport started growing rapidly.
I was lucky enough to be involved in distributing the C4 Waterman boards, some of the first SUP’s available to buy which was around 2007, before that SUP boards were custom made. I was coached in SUP surfing and downwinding by early pioneers and C4 Waterman founders Dave Parmenter, Todd Bradley, and Brian Keaulana.
The early explosive growth of the sport had leveled off before the pandemic but then blew up again during the pandemic as a safe way to get exercise while being socially distanced.
SUP History trivia:
The Molokai 2 Oahu Paddleboard Word Championship Race added a Stand Up Paddleboard division in 2006. Kevin Horgan won the race in 7:23:14
Travis Grant set the current M2O SUP solo record time of 3:59:52 in 2017
Gerry Lopez and Rainbow Sandals organized the first “Battle of the Paddle” race in 2008 with a $25,000 prize purse. The maximum board length was 12’6, which created a new category of boards.
these were the top 3 finishers of the first BOP:
Men:
1) Chuck Patterson
2) Thiebert Lucia
3) Aaron Napoleon
Women:
1) Jenny Kalmbach
2) Candice Appleby
3) Morgan Hoesterey
As of 2021, the global market for Stand Up Paddleboard gear is estimated at $1.4 Billion, growing at 10% annually, with the top 5 brands controlling a market share of about 15%
As of April 2022 the top 3 most liked Stand Up Paddleboard videos on YouTube (all proudly brought to you by blueplanetsurf):
1) “How to SUP in 5 minutes”- thumbs up: 19k, 1.5 million views
2) “Top 10 SUP Beginner Mistakes”- thumbs up: 11k
3) “SUP Tips: How to paddle straight on a Stand Up Paddleboard”- thumbs up: 9.3k
Thank you for watching!
Aloha, Robert Stehlik
Saturday, July 24, 2021
Flip Rescue: learn the technique that could save a life- tips from the S...
I'm proud of the graduates of our recent PSUPA instructor training class. To get certified as Stans Up Paddleboard instructors, they went through 18 hours of online training plus assignments, passed the written test, completed CPR and First Aid training and finally completed the "beach day" where we put all that knowledge to practice, do mock lessons, and finally end with rescue techniques. If you are helping an exhausted paddler that is too weak to get back on the board or unconscious, the best way to get them on the board is the flip rescue.
You have to start with the board upside down, get the arms of the drowning victim over the rails so their armpits are on the rails. Then you have to apply your body weight by either kneeling or standing on the opposite rail and fall back while holding the victims wrists to flip the board over so the victim ends up on the deck. Then you turn them around, get on the back and prone paddle them to shore.
Watch our group doing this for the first time and go over the most common issues and takeaways.
I highly recommend practicing this technique with a partner so you are confident and know what to do if you ever have to use it. It could help you save a life!
We will soon have an online course available that covers all the theoretical knowledge to become a certified SUP instructor, so stay tuned for more information on the training program.
For more information, please visit PSUPA.com, here is my instructor trainer Bio on the PSUPA page:
https://www.psupa.com/trainer/robert-...
Thank you for watching! If you enjoyed the video, please give it a thumbs up, subscribe to our channel and turn on notifications to see our latest videos posted on a weekly basis.
Like us on Facebook: https://www.facebook.com/bpsurf/
Follow us on Instagram: https://www.instagram.com/blueplanetsurf
Blue Planet Surf - Hawaii's SUP and Foil HQ
1221 Kona St
Honolulu, Hi 96814
Tel (808) 596 7755
open 10 am to 5 pm Hawaii Time, closed Wednesdays and Sundays
http://www.blueplanetsurf.com
Find Paradise
Aloha!
Transcript:
Aloha friends, it's Robert Stehlik with Blue Planet Surf! today's video is all about the flip rescue on a stand-up paddle board which could save someone's life so just yesterday we completed a 18-hour stand-up paddle instructor training class and the participants on the beach day where we practice in the water finished with the flip rescue using standard paddle boards and i wanted to share the video of how we're doing it give some pointers and my hope is that for those of you watching you can learn something and one day possibly save someone's life so for the demonstration i chose the biggest heaviest participant Alim with the biggest board to make it a little bit more challenging the scenario here is that Alim is close to drowning he's uh totally exhausted can't get back up on the board my first priority is to flip the board over upside down and then help him onto the board with his armpits kind of over the rails and here's a little bit off center so i'm sliding him towards the middle of the board and then with my leash still attached to my board i end up having the my board right behind his head so that's kind of a dangerous situation so i decided to ditch my board take off the leash and push the board off so to get the maximum amount of leverage i'm gonna have to stand on the board so i put both feet on the rails of the board and get a firm grip on his wrist and lean back and use my body weight to flip him over so once again in slow motion all my weight is on the rail and the firm grip leaning back using my body weight for momentum and leverage and then just flipping the board over and now alim is on the top of the board and i can rescue him so here alim is demonstrating i'm kind of already out of it he's helping me to the board now this he has to still flip the board upside down so it's a little bit difficult while i'm holding on to the board to flip it so sometimes i think it might be best to just flip the board first and then help the victim because doing both at the same time is a little bit challenging as we found out so practice makes perfect just as with anything else and uh if you've never tried this it's good to try it with a partner uh just practice it a bunch to until you feel comfortable because if you ever have to use it in an emergency situation you don't want to have to figure it out as you're doing it so here i was a little bit off center again and alim adjusted me a little bit towards the center of the board and in this case he probably could have just used his knees for leverage but he's putting one foot on leaning back and no problem for him to flip me over and of course a bigger heavier taller person is going to have an easier time flipping the board over versus a shorter more petite lighter weight person it's going to be a lot more challenging to flip that board over so then the next step is to spin the person around on your board and get on behind them and then paddle them in in this case he asked me to help him paddle but i'm pretty exhausted so i'm letting him paddle me back in to save my life so that was a great demonstration and we we're moving on with the other participants on the right side is nicole with Zorida and they're demonstrating with a smaller board it's a 9'4 fun stick which has kind of really curvy outline and a glossy finish so the bottom of that board was really slippery and because the rails are so curved it's it was kind of easier to slide off to the side and here the there's a board right behind her so nicole pushes it out of the way and that's an important thing to remember to make sure nothing's behind you when you're falling back make sure your board is not right behind you she tries to stand up but kind of slips off and then on her second attempt she's just using her knees on the rails and that gives her enough leverage to be able to hold on to the wrists and flip the board over so and then Zorida's ending up on the deck and she's able to paddle her back in now nicole was up to the challenge she wanted to try the worst case scenario so she's gonna try to flip a limb to see if she could do that with a big heavy paddler in trouble and a big wide board that definitely makes it harder of course the wider the board is the more challenging is to flip it over on a surfboard or a long board it's definitely easier to flip that board over and you don't necessarily have to stand on the bottom of the board but in this case she's definitely going to have to use all her body weight and all the leverage she can muster to get alim on the board i liked how she communicated with alim so i'm going to let you listen to that
so i thought that was really good how she checked in with the victim and making sure he's okay and to see if he can get up on him by himself and kind of explaining what she's gonna do um so here she had to flip the board over and uh almost lost him but and then another hard thing is sometimes yeah like if they can't hold on to the top and you have to figure out how to get around on the other side and obviously we're doing this in shallow water and sometimes they were cheating a little bit and using the bottom to stand on but you know obviously you don't want to use the bottom you want to pretend that you're in deep water even if you could touch the bottom okay so on her first attempt she's kind of struggling a little bit getting a good grip on alim and she's holding onto his wrist but doesn't really have a good grip on his wrist so what happens when she leans back her hands slip off and she's not able to flip alim over and like i said alim is a big heavy guy and she's petite and lighter weight and shorter so she really has to use her body weight and leverage to the max to be able to do this flip so here's her second attempt and she just doesn't carry through the momentum quite enough and she's really trying but um you know once once that momentum stops you stop moving then uh you just gotta start over again so here's her third attempt she's really determined to do this which is awesome i think and um you know you just gotta practice it to be able to do it and when when it matters right so on our third attempt she's got a really firm grip on around his wrists
okay so once she got alim on the top of the board she can now spin him around so he's facing the front and
so well done excellent rescue and that's probably to be the one of the hardest scenarios but of course it's even harder if you have to do this with an unconscious person someone that's not able to help you at all so then that that would be the most difficult scenario in this in this scenario we're assuming that the person is still conscious and can at least help a little bit which definitely makes it easier so in this case zory was able to kind of hold her victim a little bit while she's flipping the board over which can be tricky and another tricky thing is getting up on the bottom of the board you know like you have to have the right amount of leverage to get up on top and just as with getting onto a stand-up paddleboard it helps to kick your feet kind of behind you like you're swimming and then that helps you get up and then like we said this cord is super slippery so she's using her knees and then make sure you get a really good grip on the wrists she's standing up and it's too slippery to stand up but just using her knees she's able to flip flip the board over
once i put my feet up i had to commit because that first time i did it and that's that's when i like lost it right hard to do right yeah okay so now it's barbara's turn and she also did a good job communicating with the victim so let's listen in on barber's conversation i'm a certified instructor you're in good hands do not worry okay so what i'm gonna do is i'm gonna flip over the board hanging onto your hands okay i'm gonna try to hold your hands here
okay so that was really good how she reassured the victim that she's in good hands and explaining what she's going to do but once again that those slippery rails and the curvy slippery rails in the bottom of that board made it hard harder so um here's another attempt and you do have to watch out like if she slides off towards the tail the fins can be kind of dangerous so you want to make sure that you don't slide the victim into the fins like kind of that happened a little bit right there and you want to make sure that they're that you're really centered in the middle of the board so it doesn't slide to the back or the front but definitely don't want to slide towards the back towards the fins so be cognizant of that and then on this board it was definitely just easier to to use the knees instead of trying to stand up but um here she's able to do it standing up and you know if you have a bigger wider board and a heavier victim then you definitely have to get up on your feet otherwise you're just not going to have enough leverage to flip it over something to think about too when someone's drowning in the water they might struggle and kind of pull you down while you're trying to flip the board over so sometimes the best thing to do might be just push them off of you push them away while you're flipping the board and then help them get on in this case brian's asking eileen to hold on to the opposite rail of the board which is hard to do on a stand-up paddleboard because the the rails are so you know so wide so that's a little bit tricky can be tricky to go around on the other side of the board while the victim's on one side so but that worked out and then brian's able to get up and put all his weight on the rails get a firm grip on the wrists and then use his body weight to fall back and after everyone was able to complete a successful flip rescue we met and went over the takeaways so let's listen to that when you did it with that you i think you tried three times right and yeah and so what what made the difference on the third attempt so the first attempt i just completely flipped and let go of the lame i didn't have a good grip and so even you know he was so so unconscious but he did show me a better grip so the second time i almost got it but i didn't commit and so i wasn't able to flip him the third time i had the good grip and i literally had to throw my body back stand up and throw it back and when i went to once i committed to throwing myself back i could feel the board flipping over the water so that was a big feeling of accomplishment for me okay that's good any other um yeah i failed my first time yeah even though i had a small board and a small person i failed the first time because i wasn't positioned in the middle and my board was slippery so i found myself going off to the side okay so by you know doing it again in the center and going straight back made a huge difference and another takeaway was having someone conscious because one time she was actively conscious and helping me and the other time she wasn't it made a huge difference because if they're conscious you can invoke their help you can say grab onto my wrists too you can vote for their help and that makes it so much easier okay and the bottom of the board is slippery so it's it's easy to have it slip out underneath you if you're not centered right yeah that makes sense Alim do you have any takeaways just to add on to what nicole and barbara said really committing to it because initially you feel like either you or the person you're helping will get injured but if you commit to it all the way neither yourself or the person you're helping actually gets injured just all the way through okay sorry did you have any takeaways from the flip rescue technique i was using my knees because i was slipping from the feet and i had like a small girl so i was easy it was easier for me using my knees with my body weight because her board was slippery yeah so i don't know yeah i think when you have a really heavy person you need you need to get on your feet and you need to use all your body weight but otherwise just on your knees this is good do you have any takeaways commitment to it i was kind of a little giddy by getting up on my knees and kind of kind of being over someone's head and trying to stand up this little freaky so i think if you commit to it you don't you won't think about that so much i know that yeah helped right good okay so i just wanted to say a special thank you to my freshly certified group of stand-up paddle instructors you guys all did an amazing job well done and thank you for sharing your knowledge and insights i hope everybody enjoyed this and found it helpful if you liked it and think it's helpful please give it a thumbs up down below subscribe to the blue planet surf youtube channel and we'll see you on the water aloha
keywords:
Blue Planet, SUP, Stand Up Paddleboarding, paddle boarding, How to, Stand Up, Paddleboarding, Robert Stehlik, Blue Planet Surf, Honolulu, Safety, leash, wind, tips, coaching lesson, how to paddle board, how to sup, paddleboarding for beginners, first time paddleboarding, Ala Moana, Oahu, flip rescue, rescue technique, save a life, lifesaving, lifeguard, PSUPA, instructor training, class, leverage, takeaways
Saturday, March 20, 2021
Blue Planet Show Wing Foiling- Rob Whittall- Ozone Wasp V2, Armstrong A+ system-
Watch all episodes of the Blue Planet Show here:
https://www.blueplanetsurf.com/service/blue-planet-show-wing-foil-interviews/
Saturday, July 11, 2020
How to choose a Stand Up Paddle Board (SUP) for beginners
Paddle board buying guide: Stand Up Paddleboarding (SUP) is a fun, safe way to get exercise, even in the middle of a global pandemic. This video is a beginner's guide to help you choose the best paddleboard for your needs and budget. Covered: inflatable SUP vs. hard boards touring vs. all round board The Basics 1.) Conditions/ Functions 2.) Height/Weight 3.) Future Goals The Dimensions 1.) Length 2.) Width 3.) Thickness 4.) Volume The Shape 1.) Nose 2.) Tail 3.) Rails 4.) Rocker Line Some great tips on how to choose the first Stand Up Paddleboard when you are getting started. Get educated on the dimension, volume and shape features that matter for you before wasting money on a board that is not right for you. SUP's are NOT one size fits all and keep in mind that you get what you pay for. At Blue Planet we have a big selection of boards ranging from inexpensive, user-friendly starter packages and used boards for those on a budget to high end, high-performance boards for expert riders, and everything in between. Come to Blue Planet, the SUP HQ and get some expert advice on picking the right board for YOU. Aloha! For more information on choosing the best SUP board and graphics, please visit: https://www.blueplanetsurf.com/service/best-sup-standup-paddle-board/ CHOOSING THE BEST STAND UP PADDLE BOARD Aloha SUP’ers and mahalo for dropping in with Blue Planet Surf. One of the most frequent inquiries we get at our shop in Honolulu, Hawaii is how does one determines what size and type of board is right for them. As avid water enthusiasts, our main objective at Blue Planet Surf is to provide sufficient info to potential paddlers, so that they are equipped with the best knowledge to make the best decision when buying their first or additional boards for their quiver. With the right knowledge, one can choose the ideal board to suit their surfing and paddling needs and ultimately have more fun on the water. Thank you to our customers for voting Blue Planet as Hawaii’s Best Stand Up Paddle Shop. 12 BASIC POINTS Below you’ll find 12 images and graphs that will help you with the complex process of finding the right board(s) for you. As a surfer of many years (bodysurf, bodyboard, shortboard, longboard, and Stand Up Paddleboarding), I personally consider over 100 different variables when I’m choosing my own boards. For a first time SUP buyer, it would be excessive to consider so many variables, so we wanted to simplify the process for our customers. The boys at the shop and I were able to narrow a potential paddler’s focus down to 12 basic points which we use at our shop in Hawaii every day to help our customers find the perfect stand up paddle board for them. Keep in mind that surfing and paddling needs are very specific to the rider and their locale, so our images and graphs may not depict info that is 100% accurate for you and where you plan to use the board. If you have any questions about it contact Blue Planet Surf in Honolulu, Hawaii; or consult your nearest SUP/surf shop for more info. First and foremost, the paddler must consider what type of paddling they intend to do. By determining if an individual will be surfing, racing, cruising or doing a hybrid of those, they will have already narrowed their board selection down. In general, the shorter and smaller the board is, the more surfable and maneuverable it will be, while the longer and more streamlined the design is, the more efficiently the board will cover distance and the better the board will be for racing. For cruising, one should consider boards that are in between those two spectrums, and skew their choice either shorter or longer depending on how they want their board to perform. Height and weight, along with skill level, are the next big factors an individual should pay close attention to. Because paddle boarding requires the board to be on top of the water at all times (different from shortboards where the board may be fully submerged when not planing on a wave), height and weight dictate the amount of floatation the board will need to offer.
Thursday, July 18, 2019
New Balance Board- preview of the Blue Planet Balance Surfer
Introducing the Blue Planet Balance Surfer, a new product we are launching on Kickstarter, for details: http://kck.st/2lfc84l
What initially started as a quest for comfort, has now evolved into a patent-pending design that provides 3 different levels of balance challenge in 1 tool-less Board. Competing and training for long-distance races like the Molokai to Oahu race kept me in shape but I was still experiencing back and neck discomfort after long days at my computer. My chiropractor recommended raising my monitor to eye level, and I realized if I mounted it on an arm I could use it as a standing desk as well. Standing up regularly helped my back but I was still prone to bad posture and would constantly lean against my desk and load one hip with all my weight. But after using an old balance rocker board I used for SUP training, I noticed how my posture improved from the small balance rocker which was requiring me to stand upright and centered yet still allowed me to focus on my work. I began prototyping new balance board versions, hired a 3D designer to perfect the prototype design, researched manufacturers and here we are today.
With 2 previously successful Kickstarter campaigns and such a great experience interacting with the crowdfunding community, we obviously thought of Kickstarter right away when deciding how to launch this product. We love bringing new products to this community and hope you can support us in this next launch.
Aloha,
Robert Stehlik, founder/ owner of Blue Planet Surf
Wednesday, March 23, 2016
How to Stand Up Paddle with Verena Mei
Learn how to SUP with Verena Mei and Blue Planet Surf.
Verena is a professional race car driver. She grew up in Hawaii and recently moved back to Oahu. She got into Stand Up Paddleboarding and has been a great customer and supporter of Blue Planet Surf Shop. In this series she is getting tips on safety, technique, board handling and more from Blue Planet Surf founder Robert Stehlik. We will post regularly new videos on our blueplanetsurf youtube channel and plan to release the parts of this series in the Spring of 2016. For new videos please check back here and subscribe to our youtube channel.
Watch the first video in the series:
How to Stand Up Paddle Board with Verena Mei, Part 1: Safety
SUP is a great, fun, health and safe sport if practiced with some common sense.
Basic points covered in this video are:
1) Be aware of conditions. Light wind and protected water are the best conditions for beginner and learning quickly. Light winds are fine but the chop created by the wind will make balancing more difficult and you should always make sure to paddle into the wind first to make sure you can get back to where you started. Don't go out if the wind is strong, offshore winds (blowing you away from the shore) can be very dangerous as they can carry you out to sea and usually get stronger the farther out you get.
2) Always wear a leash. In Hawaii we are not required to wear a personal floatation device when Stand Up Paddle boarding but you should always wear a good leash and make sure it is attached securely, that way your boards is always attached to you and acts as your floatation device.
3) Know how to swim. This should be self explanatory, but before you learn how to SUP, you should learn how to swim first. The rule of thumb is: don't go out further from shore than you could swim back on your own power.
This is the second video in this series: board handling and gear
In this video you learn how to protect your board from heat and fin damage, how to safely lift up and carry your board and some things to consider when choosing your first board. At Blue Planet we always recommend trying several SUP's before choosing one as nothing beats trying a board to get an idea of whether it will work for you or not. Balancing should be challenging at first, as your balance quickly improves. We often talk to customers that bought their first board without trying it first and then finding out that it is just not a good board for their needs. Let's face it, it does not matter how cheap a board is or how great the deal seems to be, if you don't enjoy using the board and it sits around collecting dust, it's a waste of money. We want you to get out on the water and enjoy your board, so we want to make sure you get one that is right for you.
Keep watching the playlist to see all 11 episodes on "How to Stand Up Paddle with Verena Mei"
Tuesday, February 2, 2016
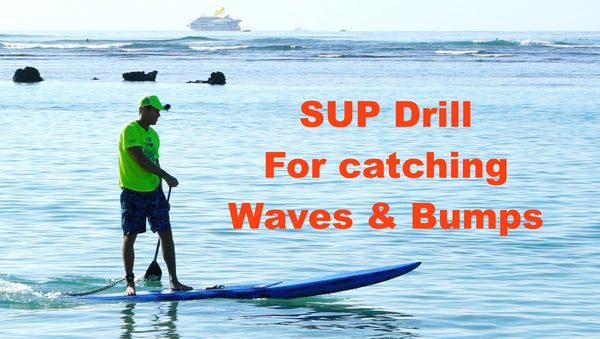
Stand Up Paddle Technique Drill: Catching Bumps and Waves on a SUP
Re-posted from this Blue Planet Blog posting:
http://blueplanetsurf.com/blogs/news/75266693-sup-tips-catching-waves-and-bumps-flatwater-drills-to-help-you-get-ready-for-open-ocean-stand-up-paddle-boarding
http://blueplanetsurf.com/blogs/news/75266693-sup-tips-catching-waves-and-bumps-flatwater-drills-to-help-you-get-ready-for-open-ocean-stand-up-paddle-boarding
If you are new to downwind stand up paddle boarding, and want to get ready to do some open ocean downwinders, these are some tips and drills you can practice in flat water to help you get ready for riding bumps on a SUP. Check the bottom of this page for information on coached downwinders.
This post is focused on downwinders and catching/ gliding on bumps, but this drill is also helpful for catching breaking waves if you want to learn to stand up paddle surf.
In this first video I'm showing how to take a few quick accelerating strokes and then pause, glide and skim/ brace the paddle to keep you stable and balanced while gliding. If you are doing a downwinder in light winds, this is what you will end up doing: a few quick accelerating strokes, then pause and glide while you are getting pulled along by the bump in front of you. In light wind you usually won't have to move the feet back, you can keep the parallel stance close to the center of the board. It's good to practice this drill in flat water to break the habit of paddling with long, powerful strokes at a steady pace. Downwinders are about quick sprints and glides, so you have to learn to break up your pace. The first step is to practice taking 3,4, or 5 quick strokes and then let the board glide for about the same amount of time, so you are only paddling for about half the time. Don't worry about moving your feet at first and just get into a good rhythm of accelerating and then gliding and skimming your paddle for balance. Try to skim it as far out to the side as possible with the paddle at a low angle to the water for side to side stability and behind you for front to back stability. Just skim the paddle lightly over the surface, you don't want to break, just keep the paddle very close to the water or skim very lightly over the surface. While skimming the paddle acts as a third leg which will give you more control and will allow you to feel more comfortable in rougher conditions. If you do loose your balance you can lean on the paddle and push your center of gravity back over the center of the board.
This next video shows how to start in "first gear" by taking quick, short strokes for powerful acceleration. You want to focus on keeping your stroke in front of your feet and using quick bursts of power to accelerate. Practice this in flat water as well as you will not have time to focus on this when conditions get rough.
When the wind is stronger and the bumps get steeper, you will also have to move your weight back on the board to keep the nose from piercing and to allow your board to release and accelerate by planing on top of the water surface and to reduce the amount of wetted surface. So, once you are good at stroking quickly to accelerate and then gliding while skimming the paddle, the next step is to also practice moving your feet back as you stop paddling and glide. As the board slows down and the tail starts to sink, you then have to move your weight back forward close to center quickly and take some more quick acceleration strokes. The video below has some helpful tips for moving your feet around on the board without rocking the board and loosing your balance:
If you do this for a while, you will notice that these quick sprints followed by pauses of gliding will actually be very hard work and your heart rate will go up to a higher rate than when paddling at a steady pace. I find that my heart rate goes up significantly higher in downwinders than when flatwater paddling which is why it is so important to relax and rest while you get a free ride when gliding on and connecting bumps. If you don't rest it is hard to catch the next bump. There is a misconception that when the wind blows hard you hardly have to paddle anymore. The reality is that you have to accelerate more quickly and paddle even harder to catch the faster moving bumps on the really windy days if you want to keep up with the really fast guys. The goal is to move as close to the speed of the bumps as possible and the stronger the wind is and the longer the fetch (the distance the wind has to create bumps), the faster you have to move to catch them.
The next video covers the five most common mistakes made by first timers on downwind runs and will be helpful to watch as well if you want to improve your downwind stand up paddle technique.
Thank you for watching!
Aloha,
Robert Stehlik
Copyright Blue Planet Surf 2016, you are welcome to re-post or share this content but please credit Blue Planet Surf and put a link to www.blueplanetsurf.com
Resources mentioned in the videos:
For more information on our weekly SUP training group, please visit:
http://zenwaterman.blogspot.com/2012/10/weekly-time-trials-in-hawaii-kai-video.html
http://zenwaterman.blogspot.com/2012/10/weekly-time-trials-in-hawaii-kai-video.html
For information on SUP lessons and downwind coaching by Robert Stehlik, please visit: http://blueplanetsurf.com/collections/lessons
For information on downwind coaching with Jeff Chang/ Wet Feet, please visit: http://www.wetfeethawaii.com/pages/lessons-tours.html
For information on coached downwinders with Jeremy Riggs on Maui: http://paddlewithriggs.com
Safety first: Downwinders can be dangerous. Always go with a partner or group and if you are going for the first time, go with an experienced paddler or coach. Have a plan and set up meeting places if you loose sight of each other, with can happen quickly in open ocean conditions. Take a cellphone in a waterproof case and/ or a EPIRB. Always wear a leash and make sure all your equipment is in good condition.
Equipment used in the videos:
Rasta downwind board: 14' x 28" 2016 Bump Rider: http://blueplanetsurf.com/products/140-x-28-bump-rider-2016
Blue downwind board: 12'6 x 28" 2016 Bump Surfer: http://blueplanetsurf.com/collections/2016-blue-planet-sups-2/products/126-x-28-bump-surfer-2016
Paddle: Kai Zen with 88 blade: http://blueplanetsurf.com/collections/paddles/products/blue-planet-2016-kai-zen-cf-paddle-early-bird-pre-orders-until-12-31-15
Subscribe to:
Posts (Atom)